Fridrich (CFOP) Method
Introduction
Note: This is a first draft, and like all my first drafts, this page is a complete mess.
The cross is the first step of the CFOP method, and with enough practice, can be done in less than 2 seconds. This step is completely intuitive, so no algorithms are needed to be remembered - you have to just have to know how to make the cross. I will try to explain how to solve it efficiently (the cross can be solved in 7 moves or less except in 102 cases) by showing you some techniques and examples.
First and foremost, decide on a color to do the cross. Most people prefer white because the white stickers are easiest to find. Memorize the order of the colors of the four faces around the face of that color. For example, in the American Color Scheme, the blue, red, green, and orange faces circle around the white face in a clockwise direction. Knowing that order is very important.I will be using a white cross with the American Color Scheme in the rest of this guide.
The four edge pieces of the cross need to be in their correct locations.
| Good Cross | Bad Cross |
|---|---|
  |
 |
| The red-white edge piece lines up with the red center. The green-white edge piece lines up with the green center. The orange-white edge piece lines up with the orange center. The blue-white edge piece lines up with the blue center. | The red-white edge piece does not line up with the red center. The green-white edge piece does not line up with the green center. |
Some people make a "bad cross" first and then fix it by swapping the edges around. Although this is easy and works, it takes too many moves and too much time. When going for speed, this should be avoided. The four edges should be placed in the correct order (blue-red-green-orange clockwise around white), and then aligned with their centers (if they are not already) with a simple D, D2, or D'.
Here are some simple techniques for placing the edges in their designated locations. In all of these examples, three of the four cross pieces are already in their designated spots. Pay attention to how the white-green cross piece is put in without affecting the other pieces of the cross.
| Diagram | Moves | Comments |
|---|---|---|
|
This one is very simple. Because white in on the U-face, the move moves it to the D-face. | |
|
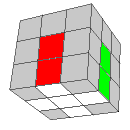
Here, the move for the previous case will not work because the edge will be placed in it's spot, but it will be flipped. It needed to be placed in from the side. | |
|
These are examples when the edge is in the middle layer. Whenver that happens, move the D face until the egde is aligned in a way with it's designated so that it can be put in. | |
|
||
|
The examples above are useful when you are completing the cross with the final edge. However, it's not practical to do this with all four edges, as that would take too many moves. Working on one edge at a time will make your time slower. Instead, try to put more than one edge in at the same time, by using one edge to help another edge, as in the examples below.
| Diagram | Moves | Comments |
|---|---|---|
|
The green cross piece is in the same position as the second of examples in the previous table. However in this case, the orang cross piece to the side can be used to help put the green one in, while putting the orange one at the same time. |